Techspert Opinion: Tablets vs. laptops for business utilization

Standard

11057003-large


Hello again, and welcome back! Today I was asked a question by a client that I felt would be a good opportunity for a quick blog post for our followers to see for themselves. The question was: “I am thinking about purchasing a tablet and using that, instead of my laptop, for work. How do you feel about that?” Great question, especially considering that, lately, the tablet craze is exactly that: a CRAZE! So here is my personal opinion, one that may not reflect the opinions of others (please keep that in mind):

In today’s world, people are all about convenience and mobility, as everyone is always on the move. Tablet manufacturers are catering to this and making them the pinnacle of mobility.  Now, to me, mobility does not always mean it is the best choice.

Laptops these days are becoming more and more powerful, equally as powerful as a desktop when it comes to storage and processing power. Tablets, for the most part, are still evolving. Since they are smaller and targeted towards people on the go, the processing power and storage capability are not as good as laptops. So in relation to the question “will it suit my needs?” it all depends on what type of work you will be doing. If you are doing the occasional typing of a document, sending emails, or working in a spreadsheet, then sure. But if you are running any programs that utilize a high amount of your computer’s resources, then I would stick to the laptop.

Tablets are good for what they are intended for, but the ability to upgrade them to handle more is very limited. Most laptops, if you need more “go power,” you have the ability to upgrade the RAM, disk space etc. so you can accommodate most changes. Both have the pros and cons, but in my mind laptops are still the way to go when mobile work is the topic.

Feel free to ask you friendly Everon tech for their thoughts and suggestions (888-244-1748), and also these opinions stated above may not be yours. The thing with technology is there are so many things out there and many may be suitable for some and not for others, but you always have multiple things to choose from. :)


Quick trick on How To Remove ALL Windows Temp Files

Standard

Windows has temp files stashed in a wide variety of places, including hidden directories that most people will never find.  These hidden temp file locations are some of the favorite hiding places for viruses and malware.  In some cases, they can slow down a computer that is running low on disk space.

The best application that I have found to accomplish this is TFC.EXE by Old Timer.

I clear all temp files
1. before running virus/malware scans
2. and on computers that are running slow.

Here is how I use TFC.exe to remove all these hidden temp files.

NOTE:
TFC (Temp File Cleaner) will clear out all temp folders for all user accounts (temp, IE temp, java, FF, Opera, Chrome, Safari), including Administrator, All Users, LocalService, NetworkService, and any other accounts in the user folder. It also cleans out the %systemroot%\temp folder and checks for .tmp files in the %systemdrive% root folder, %systemroot%, and the system32 folder (both 32bit and 64bit on 64bit OSs). It shows the amount removed for each location found (in bytes) and the total removed (in MB). Before running it will stop Explorer and all other running apps. When finished, if a reboot is required the user must reboot to finish clearing any in-use temp files.

TFC only cleans temp folders. TFC will not clean URL history, prefetch, or cookies. Depending on how often someone cleans their temp folders, their system hardware, and how many accounts are present, it can take anywhere from a few seconds to a minute or more. TFC will completely clear all temp files where other temp file cleaners may fail. TFC requires a reboot immediately after running. Be sure to save any unsaved work before running TFC.

Here is how to use TFC to remove all your hidden temp files.

1.

Download your copy of TFC.exe

You can do a search for TFC.exe and Old Timer to find a current location that offers the file.

One such location is:

http://www.geekstogo.com/forum/files/file/187-tfc-temp-file-cleaner-by-oldtimer/

2.

Close all open applications

Save your work and close all applications.

3.

Run TFC.exe

All applications will be stopped and you maybe forced to reboot after the scan and removal process is completed.

SAVE ALL YOUR WORK

TFC needs no installation and can be run directly.by clicking on the TFX.EXE file.

ARGH Java update pop up go away!

Standard

The problem when you go to the control panel and disable Java updates when you close the window if you go back it is re-enabled, not sure why they would even have that if it doesn’t work.
I manage a lot of computers that reset themselves when the user logs of or the computer is rebooted, the java update popup is just an annoying waste of time for those users. For these I need to update when I say.
Also some of my equipment that I manage works best with old java and browser, I know there are work rounds but I have my own, I have a virtual desktop that I run what I need and it is okay since I only use it for certain task. Otherwise you should probably keep things up to date.

1.  

Using Explorer locate the java control panel (javacpl.exe)

The javacpl.exe file for 32-bit Windows Vista and higher is located at.

C:\Program Files\Java\jre6\bin\javacpl.exe, or
C:\Program Files\Java\jre7\bin\javacpl.exe, depending on the Java release   you’re using.

For Windows Vista x64, Windows 7 x64 or Windows 8 x64 you should instead   look for:

C:\Program Files (x86)\Java\jre6\bin\javacpl.exe, or
C:\Program Files (x86)\Java\jre7\bin\javacpl.exe
Now
Right click the javacpl.exe and run with admin privileges.
Uncheck java update, save and then reopen it to check that the setting is   sticking.


Creating a Single Inbox for All Accounts in Outlook 2010

Standard

There is no doubt that Outlook 2010 is great when it comes to managing multiple email accounts, but is lacking in the ability to create a single inbox folder for all your accounts.  Let’s say you want to view all the  emails  you receive from all your different configured accounts including, Yahoo Mail, Gmail, Hotmail, etc… There is not a single folder for receiving or monitoring all those emails.  On the good side, hidden in the Rules ability, there is a feature to set up a single folder enabling the setup of one single folder for all your emails.

Launch Outlook 2010 and from the left sidebar, select an account, right-click it and select New Folder. From the Create New Folder dialog, enter an appropriate name and click OK. For this example, we’ll call it ‘Generic InBox’.

picture one

Next, go to the Home tab and click  Manage Rules & Alerts from the Rules drop-down button.

Picture two

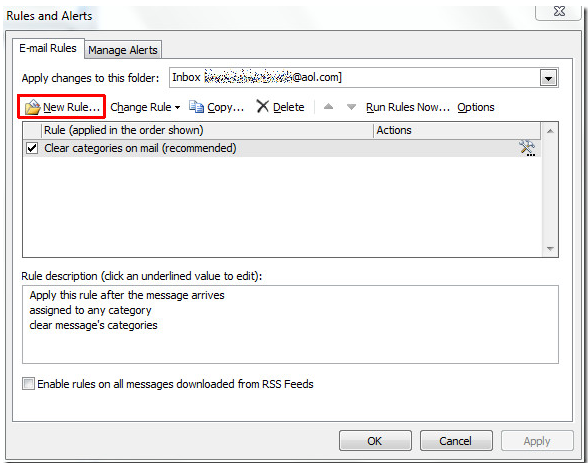
From the Rules and Alerts dialog, select an account and click New Rule.

Picture three

In Rules Wizard, we’ll start off by creating a blank rule. Click Apply Rule on Messages I Receive and hit Next.

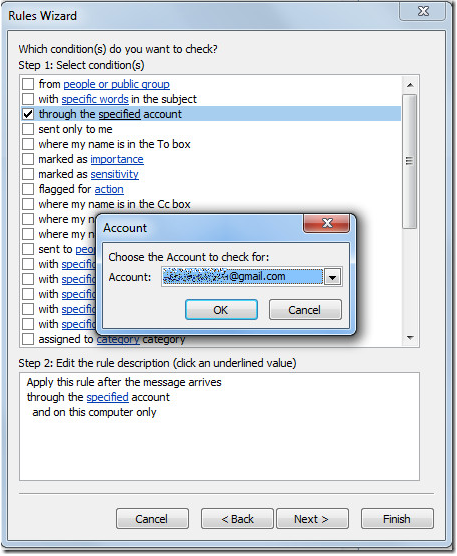
Continue to follow the wizard set up, enable through the specified account option.  From the bottom of the dialog window, click Specified Account and select the desired account from the Account dialog window, and click OK.

Picture five

After this step you will see the specified account in the bottom of the dialog window. Just click next to continue.

picture six

In this step, enable Move It to the Specified Folder option then click Specified at the bottom of the window. Select the Generic Inbox folder recently created, from New Rules and Alerts dialog.

Picture sevem

The folder name will be visible at the bottom of the window.  Click finish to exit the wizard.

picture 8

This will bring back the Rules and Alerts dialog, showing the rule you created. Click OK and apply this new rule.

picture nine

For associating this folder with other accounts, repeat the whole procedure to
direct all mails from multiple accounts to the Generic Inbox folder. On
receiving emails, you will see all the emails in the specified mail folder.

Change Your Browser in Windows 8

Standard

Windows 8 comes with Internet Explorer 10 preinstalled; one for the Metro UI and one for the desktop. If you do not like either version, then you can go ahead and install a different browser like Google Chrome, FireFox or Safari. However, choosing to set the browser as the default browser in Windows 8 during the install doesn’t really seem to work, at least not for Chrome.

It appears that Microsoft just ignores that option and keeps Internet Explorer as the default browser. In order to change it, you have to manually set the third-party browser as default. I will show you how to do this.

First, go ahead and install whichever browser you want to use instead of Internet Explorer. Then go to the Control Panel in Windows 8.

Then click on the Set your default programs link.

Next find the browser in the left-hand pane and then click the Set this program as default link.

That will set Chrome or whichever browser you want as the default for whatever file types and protocols are allowed.